Changing an object’s color in Photoshop is a cool and easy skill. When I first learned how to change an object’s color in Photoshop, I was amazed at how easily I could do it! There are a few methods you can use to change an object’s color. Whether you want to experiment with different color schemes, correct a color imbalance, or simply add a touch of creativity, Photoshop provides a variety of tools and methods to accomplish this task.
The method of changing colors has made life easier for eCommerce shop owners and product photographers. Are you curious to know how it helps them? Suppose you have a t-shirt or product with various color variants available for sale. You can shoot a single photo and later create other color variants using Photoshop’s object coloring methods. This way, a shop owner saves on photography costs, and a photographer saves time on multiple shoots. 🙂
These easy step-by-step instructions will help you become a master at changing the color of an object in Photoshop.
Open Your Image for Color Change in Photoshop.
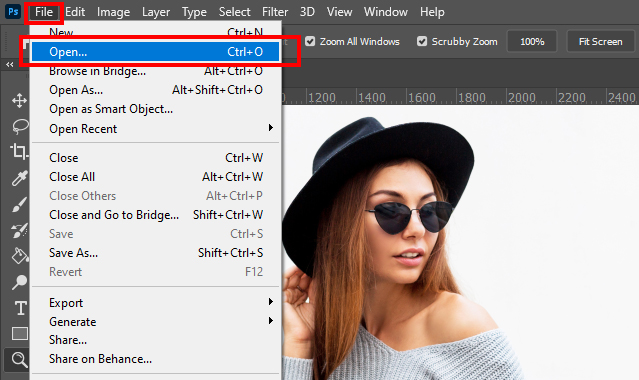
To open an image in Photoshop, select “Open” from the “File” menu. Browse to the image’s location, choose the file you want to recolor, and click “Open.” The image will then appear in the Photoshop workspace for further editing.
Select the object accurately
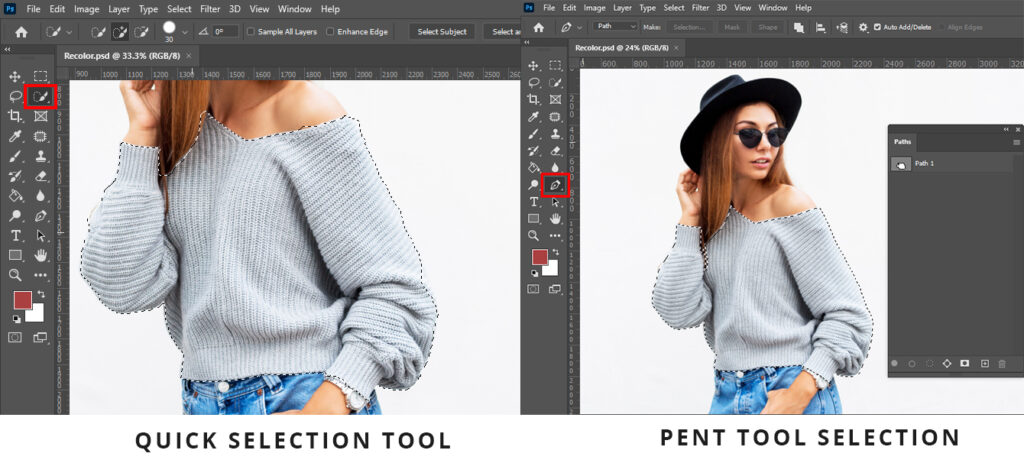
To select your object, you can use either the Quick Selection tool or the Pen tool in Photoshop. These are recommended tools for precise selection.
Quick Selection Tool
Use the Quick Selection tool when your object’s color is significantly different from the background. Simply drag the tool over the object to select it. For better accuracy, hold the Alt key and drag to subtract any unwanted areas along the edges.
Pen Tool
The Pen tool is an excellent option for selecting objects with high precision. Many professional photo editors prefer using the Pen tool. To select an object using the Pen tool, carefully draw a path around the object, following its contours closely. After completing the path, press Ctrl + Enter (Command + Return on Mac) to convert your path into a selection.
Ensure that your selection is as accurate as possible to achieve the desired results. Once you have selected the object, you can proceed to change its color.
Create a New Solid Color Adjustment Layer
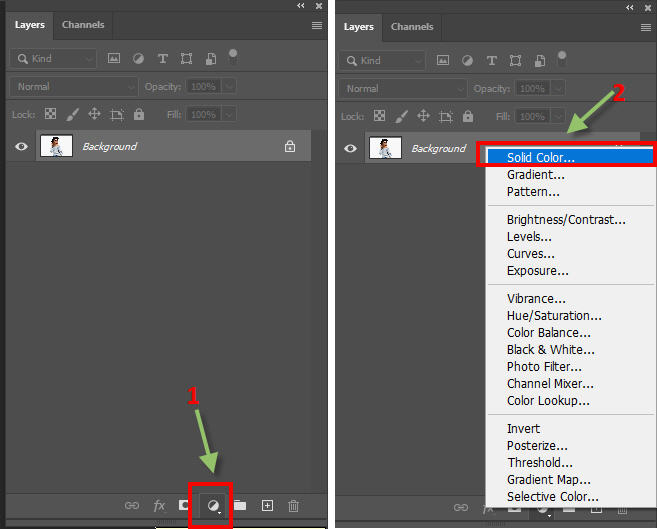
After selecting the object, navigate to the Layers panel. If you can’t see the Layers panel, press F7 or go to “Windows” and click on “Layers.” Next, click on the “Create new fill or adjustment” icon. A Solid Color Picker window will appear.
Choose Your Desired Color
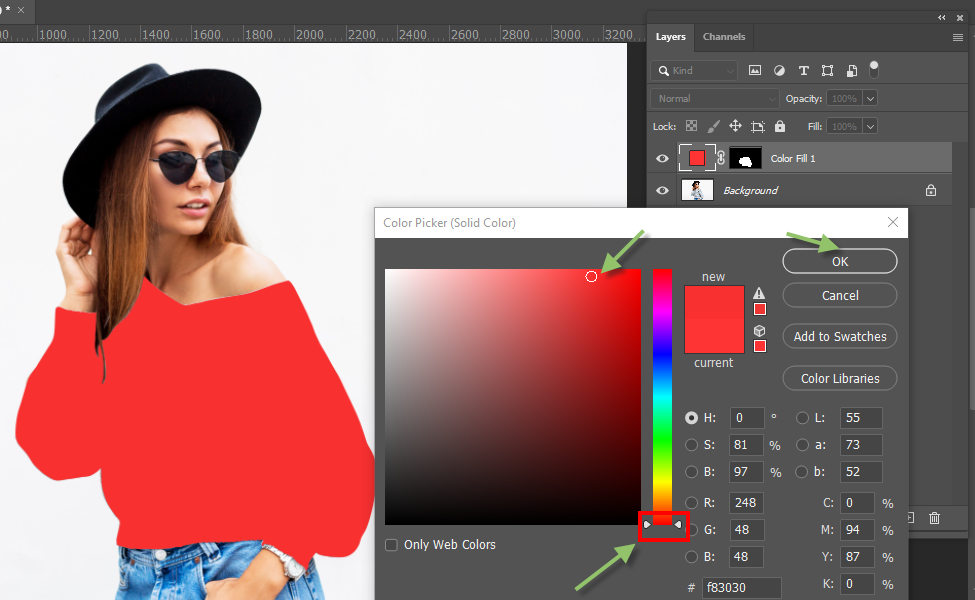
Now, pick your desired color to change the color of your object. If you’re unsure about selecting the right color, aim for a closely related shade or use a specific color code if you have one. You can always adjust it later by double-clicking on the Solid Color layer. Once you’ve chosen your color, click “OK.” A new Solid Color Adjustment Layer will be added to your Layers panel.
Apply Multiply Blend Mode to Solid Color Layer
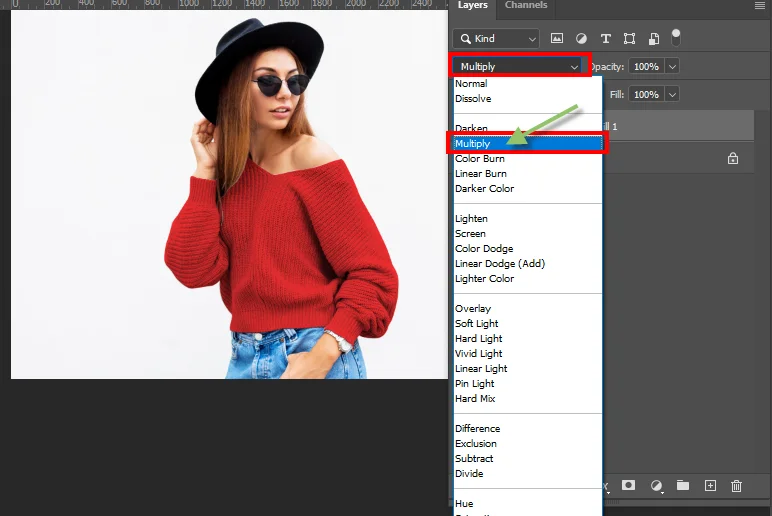
Now, make your Solid Color layer multiply. Ensure that you have selected the Solid Color layer (it should be selected by default after picking the desired color from the Solid Color window). In the top of the Layers panel, choose “Multiply” from the blend mode dropdown menu. This will apply the multiply color effect to the layer.
Apply Additional Adjustments
Once you have created the Solid Color adjustment layer with the Multiply blend mode, you can further enhance the color to achieve a more professional and visually appealing result.
To make additional adjustments to the object for color changing, it is recommended to create a group and apply a mask to the selection within that group. This allows you to apply color adjustments specifically to the selected object, rather than affecting the entire image.
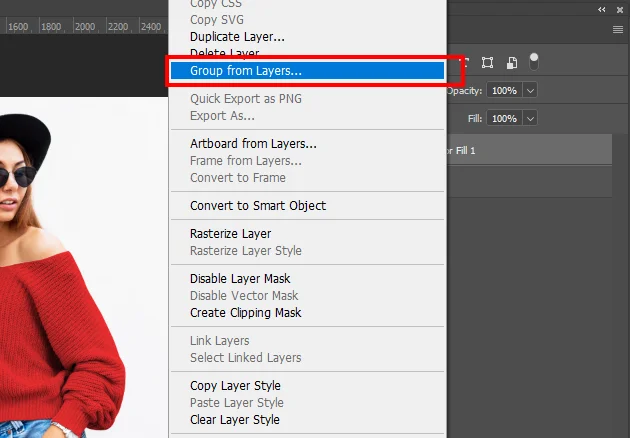
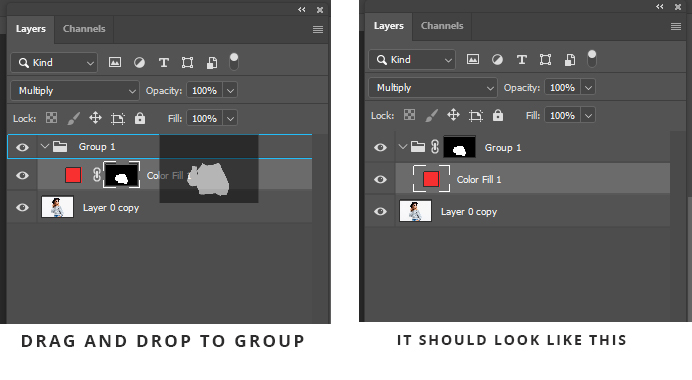
Start by selecting the Solid Color adjustment layer and creating a group using Ctrl + G (or right-click and choose “Group” from the layers options). Then, add a layer mask to the group by clicking on the “Add Layer Mask” icon at the bottom of the Layers panel.
Now, any color adjustments you make within this group will be applied exclusively to the selected object. To refine the color changes, you can create additional adjustment layers and experiment with different settings until you achieve the desired color effect. This technique ensures precise color adjustments without impacting the rest of the image.
Here are some key points for each adjustment layer that you can use to modify the color of an object:
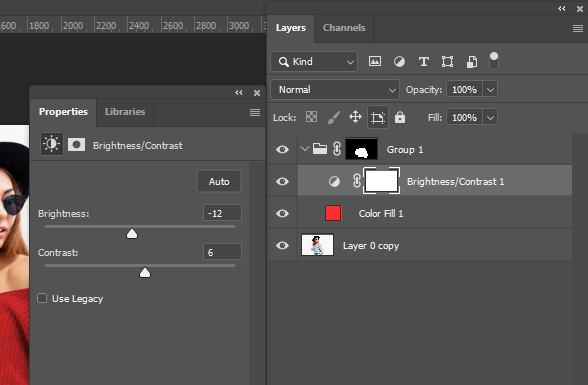
- Increase or decrease the brightness and adjust the contrast of the object.
- Enhance the overall lightness or darkness of the object to achieve the desired effect.
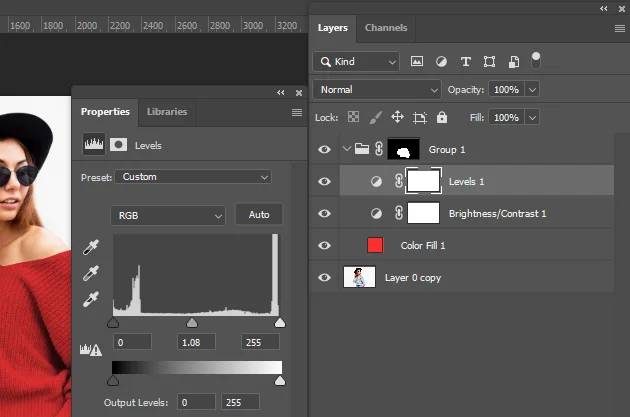
- Adjust the tonal range of the object by manipulating the shadows, midtones, and highlights.
- Fine-tune the contrast and color balance of the object by setting the black point, white point, and gray point.
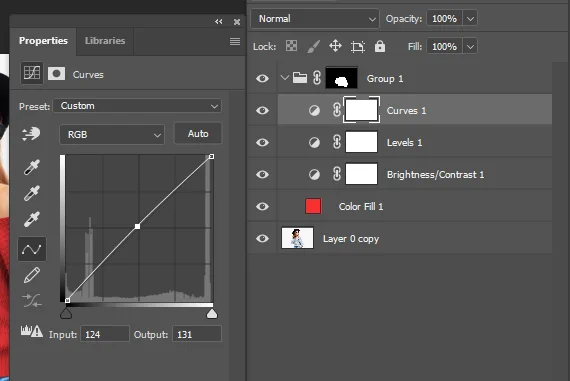
- Modify the tonal range and contrast of the object using a customizable curve graph.
- Adjust specific points on the curve to control the brightness and contrast in different areas of the object.
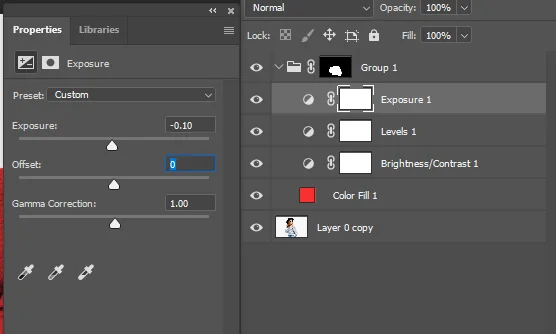
- Alter the exposure settings of the object to make it brighter or darker.
- Adjust the offset, gamma correction, and exposure values to achieve the desired exposure level.
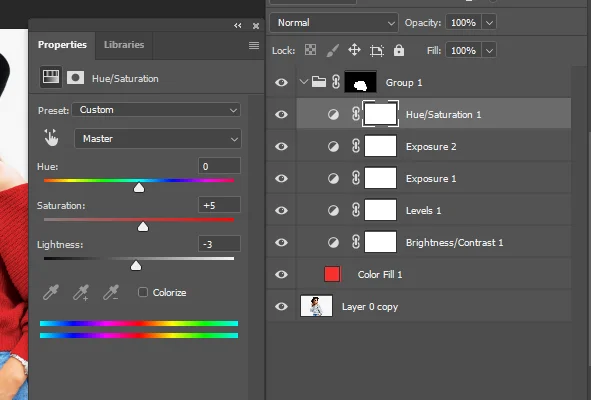
- Change the hue, saturation, and lightness of the object’s colors.
- Shift the overall color tone, intensify or desaturate specific colors, or adjust the brightness of individual color channels.
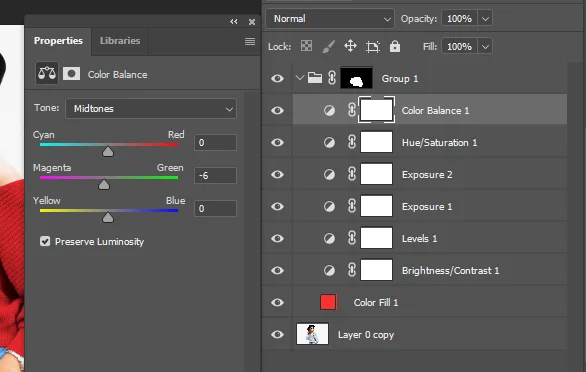
- Fine-tune the overall color balance of the object by adjusting the shadows, midtones, and highlights.
- Shift the color tones towards warm or cool hues to achieve the desired color balance.
Remember, these adjustment layers can be used individually or in combination to achieve the desired color changes for your object. Experiment with different settings to find the perfect balance and achieve the desired color effect
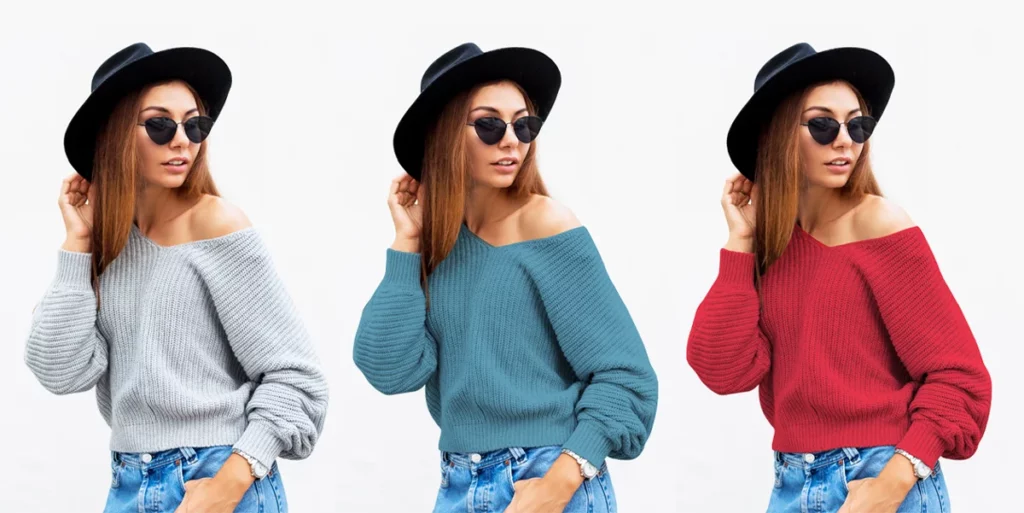
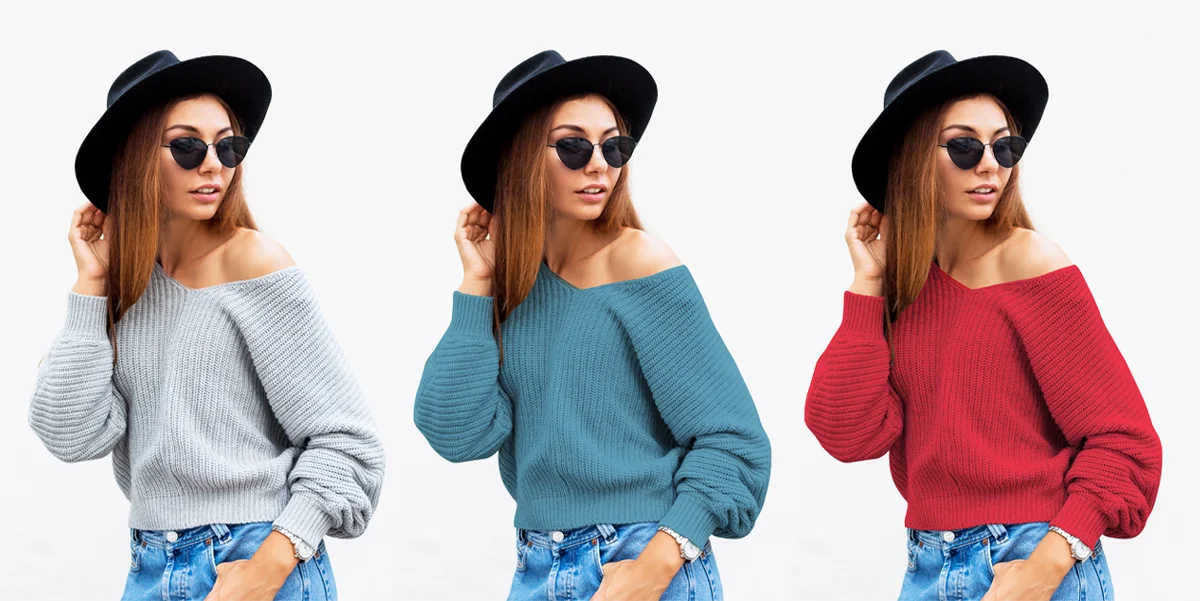
This is the result of changing the color of an object in Photoshop. You can change the color of any object using this method. There are several methods to change color, but this one is my favorite for changing the color of an object.
Save and Export
Once you are satisfied with the color change, it’s time to save your work. Use the “Save As” option to create a new file, preserving the original image and the modifications you have made. Additionally, you can also export the image in a format suitable for your intended use, such as JPEG or PNG.