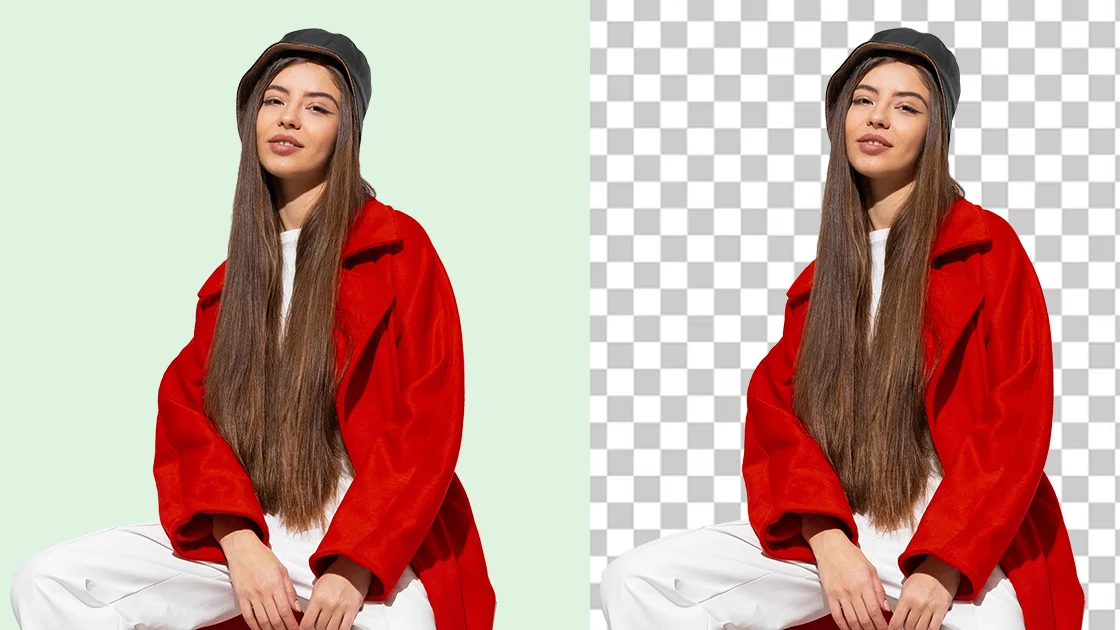
Make your logo, product, or picture backgrounds transparent in seconds using popular tools like Photoshop, GIMP, Canva, and Google Slides.
Sometimes, we need our products, logos, or elements to be displayed without a background. A transparent background enables us to integrate them into any design, ensuring everything looks harmonious. Having a transparent background for a product or element facilitates easy and flawless design without any distractions or limitations.
1. Adobe Photoshop
When it comes to creating clean and professional images with transparent backgrounds, Adobe Photoshop stands as the top choice. With various tools available, you can easily remove the background from your image within Photoshop and save it as a PNG file.
How to Make a Transparent Background in Photoshop
Creating a transparent background in Adobe Photoshop is a straightforward process that allows you to isolate your subject and seamlessly integrate it into different designs or contexts. Follow these steps to make a transparent background in Photoshop:
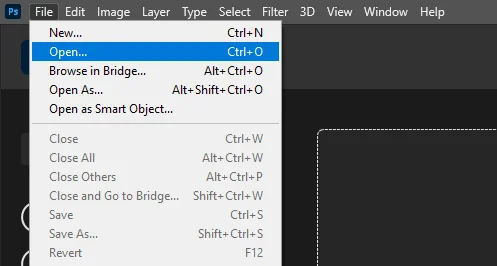
Step 1. Open your image
Launch Photoshop and open the image you want to make transparent background by selecting “File” > “Open” from the menu or by using the keyboard shortcut Ctrl+O (Cmd+O on a Mac).
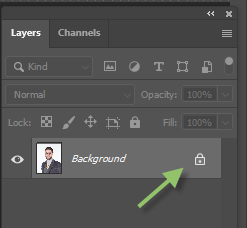
Step 2. Unlock the layer by clicking on the lock icon in the layer panel.
Before selecting the subject, unlock the layer by clicking on the lock icon in the layer panel.
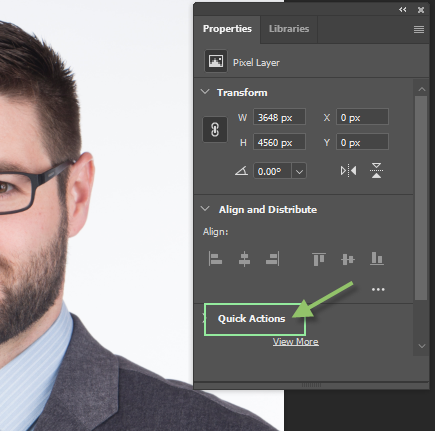
Step 3. Select the "Properties" panel from the "Window" menu.
To open the Properties panel in Adobe Photoshop, simply go to the top menu and click on “Window” and then select “Properties”. This will open the Properties panel.

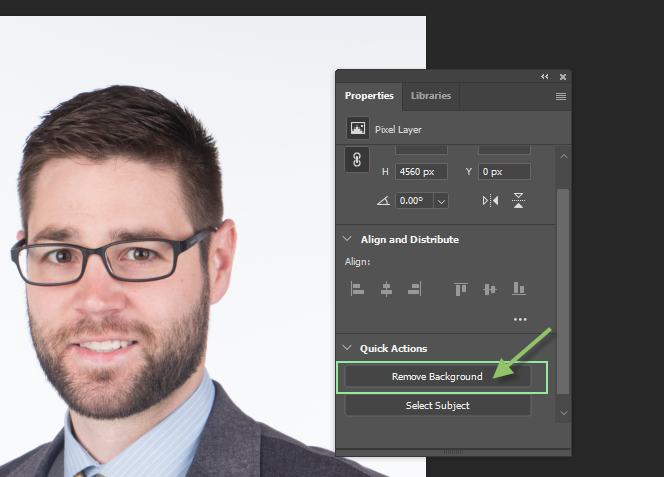
Step 4. Click on "Quick Actions" in the Properties panel.
In the Properties panel, click on “Quick Actions”. After clicking on Quick Actions, you will see two options: “Remove Background” and “Select Subject”
Step 5. Click on "Remove Background".
To achieve a transparent background, click on the “Background Remove” option in the Properties panel.
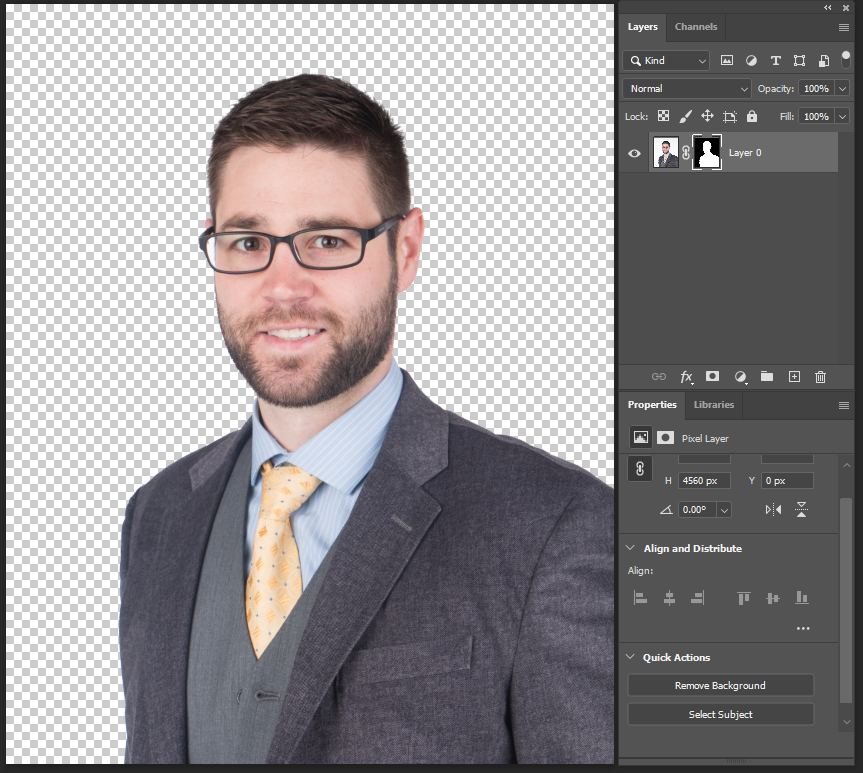
Step 6. The background has been automatically deleted!
After clicking on “Background Removal,” your image’s background will automatically become transparent within a few seconds.
As an alternative method, choose the suitable selection tool from the toolbar, such as the Magic Wand, Quick Selection, or Pen Tool. Use this tool to meticulously select the subject in your image, ensuring a precise and clean selection. and delete background
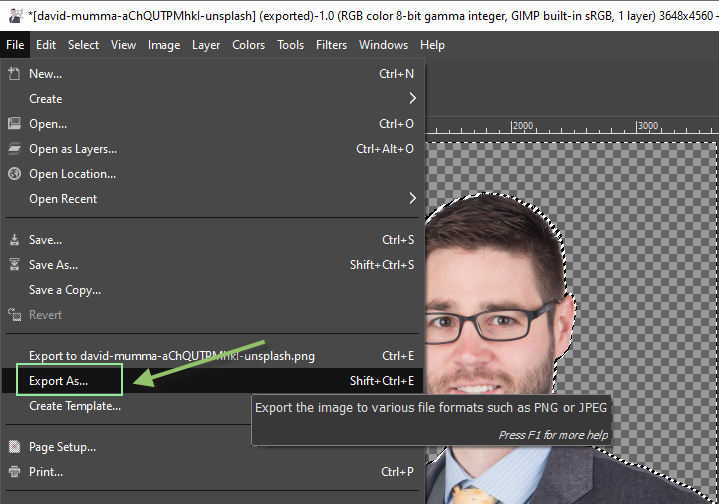
Step 7. Save your image as PNG
After deleting the background from your image, make sure to save it as a PNG file format. To do this, go to the “File” menu and choose “Save As,” or use the keyboard shortcut Ctrl+Shift+S (Cmd+Shift+S on a Mac). In the Save As dialog box, select PNG as the file format and click “Save”.
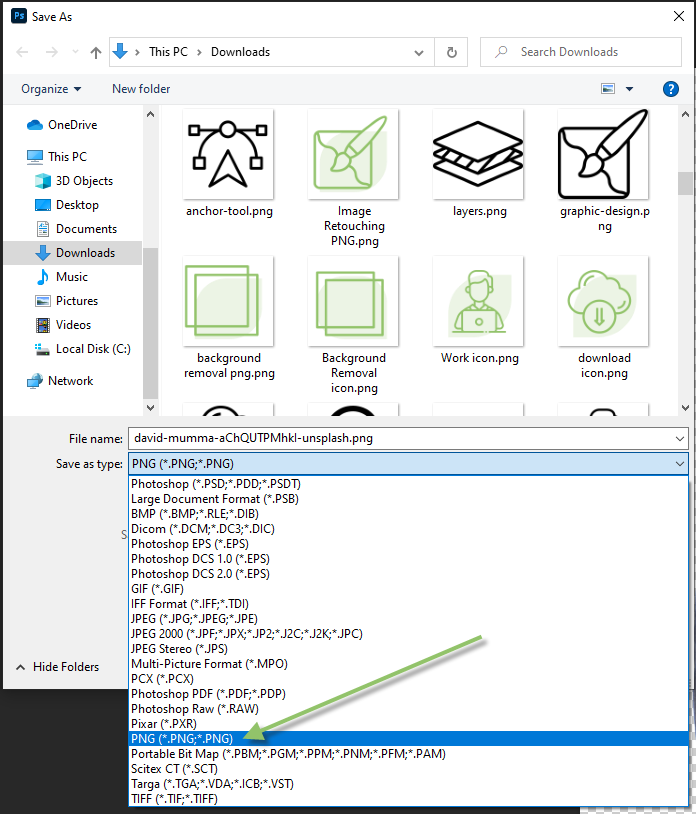
It’s important to choose PNG to preserve the transparency of your image. If you select JPEG or any other format, Photoshop will automatically add a white background. Therefore, to maintain transparency, remember to save your image as PNG.
Tips for a High-Quality Transparent Background.
If you are new to Photoshop and find it challenging to remove the background from your image perfectly, I recommend using a background removal service provider when uploading images to your shop or website. These experts specialize in removing backgrounds and creating transparent backgrounds without compromising the integrity of the subject. This ensures a professional and flawless result for your images.
2. GIMP
How to Make a Transparent Background in GIMP
To make a transparent background in GIMP, follow these steps:
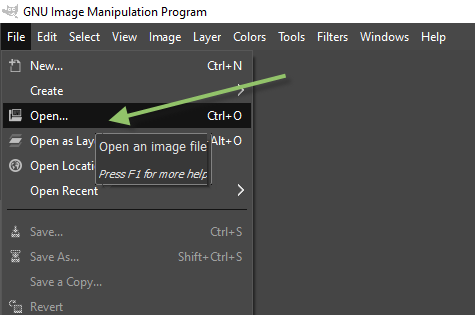
Step 1. Open the image in GIMP.
Launch GIMP and load the image you want to make a transparent background for by either selecting “File” > “Open” from the menu or simply dragging and dropping the image into GIMP.
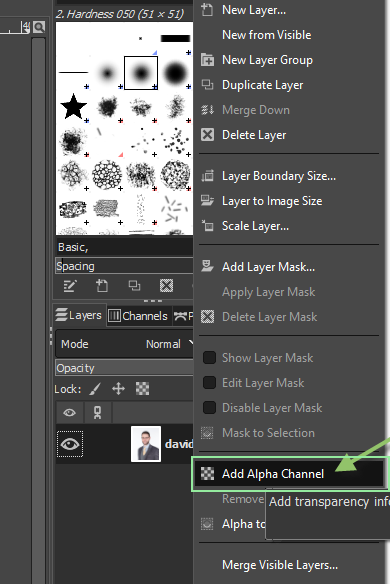
Step 2. Add Alpha Channel.
From the Layers panel, right-click on the background layer and Click on “Add Alpha Channel.” This step is necessary to enable transparency.
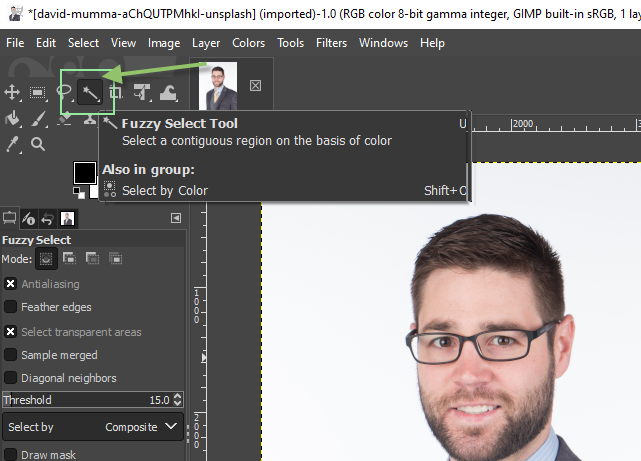
Step 3. Select the Fuzzy Select Tool.
Next, select the “Fuzzy Select Tool” (also known as the Magic Wand tool) from the Toolbox. Adjust the tool’s threshold as needed to ensure accurate selection.
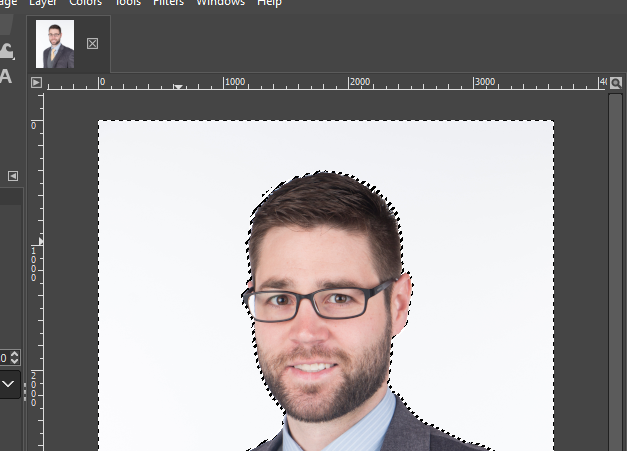
Step 4. Click on the background area to select the background
Click on the background area of your image with the Fuzzy Select Tool. It will automatically select the connected pixels with similar colors.
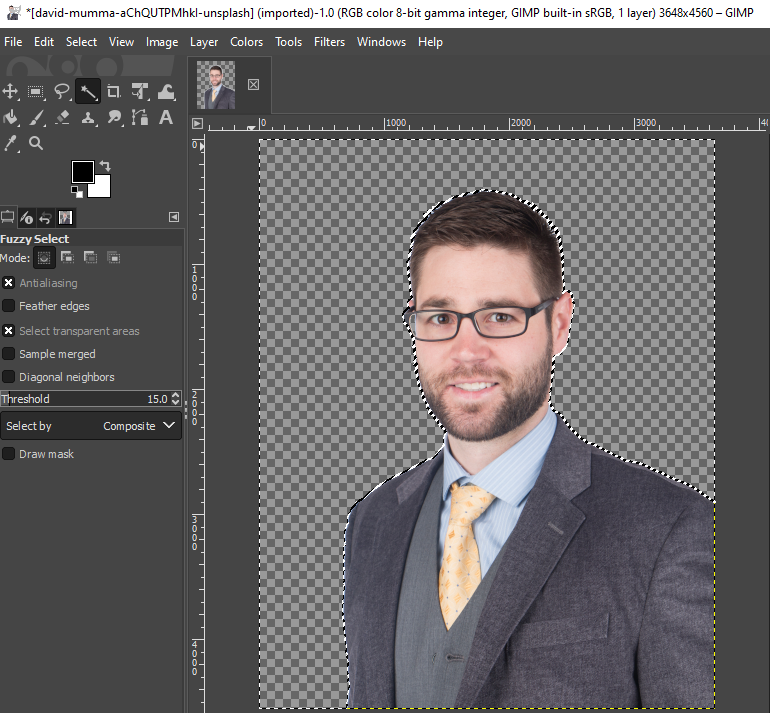
Step 4. Delete The background
Once the background is selected, press the “Delete” key on your keyboard. This will delete the selected background pixels, leaving a transparent background behind.
Note: If there are edges around the subject, you can refine them by using the “Eraser Tool” or “Brush Tool” with a soft brush. This allows you to remove any remnants of the background or clean up any rough edges, resulting in a more professional and clean image.
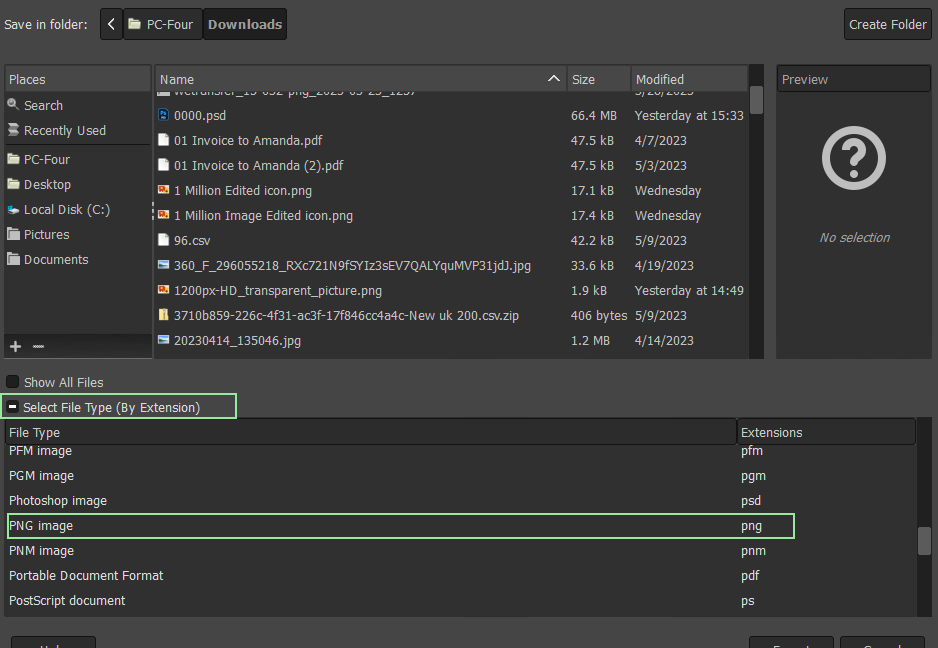
Step 5. Export As PNG
Save your image with a transparent background by selecting “File” > “Export As” or “File” > “Export” and choose the PNG file format from the “Select File Type” options.
By following these steps, you can easily create a transparent background for your image using GIMP.
3. Canva
Canva is a popular online design platform that offers a wide range of creative tools and features. While it’s known for its user-friendly interface and extensive library of templates, Canva also provides the ability to create designs with transparent backgrounds.
How to Make a Transparent Background in Canva
To make a transparent background in Canva, follow these steps:
Step 1. Sign up or sign in to Canva.
If you are new to Canva, sign up for an account using your email and log in to Canva. If you already have an account, simply sign in to Canva.
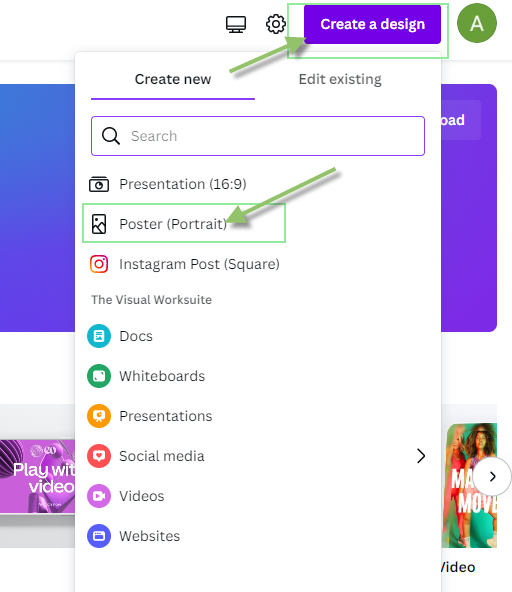
Step 2. Create a New Design
To create a new design, click on “Create a design” or open an existing one. Alternatively, you can select any design from the dashboard and delete all elements from the template.
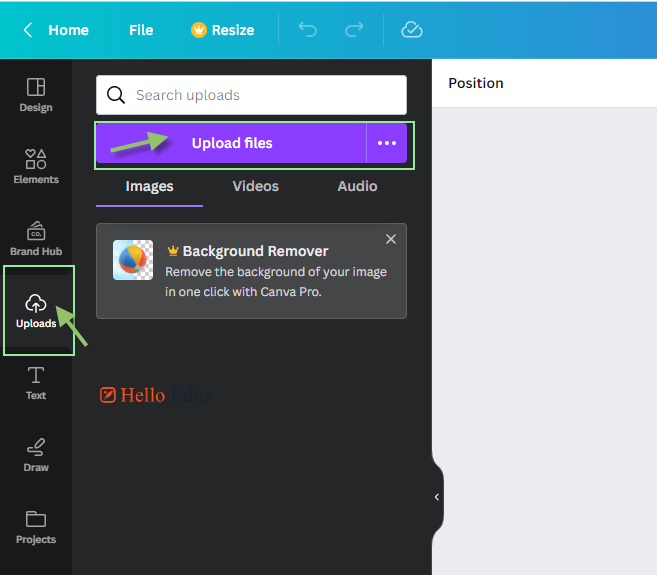
Step 3. Upload your image
Upload the image that you want to have a transparent background by clicking on “Upload” and selecting “Upload Files.” Once the image is uploaded, simply click on the image or select it and drag and drop it onto the canvas.
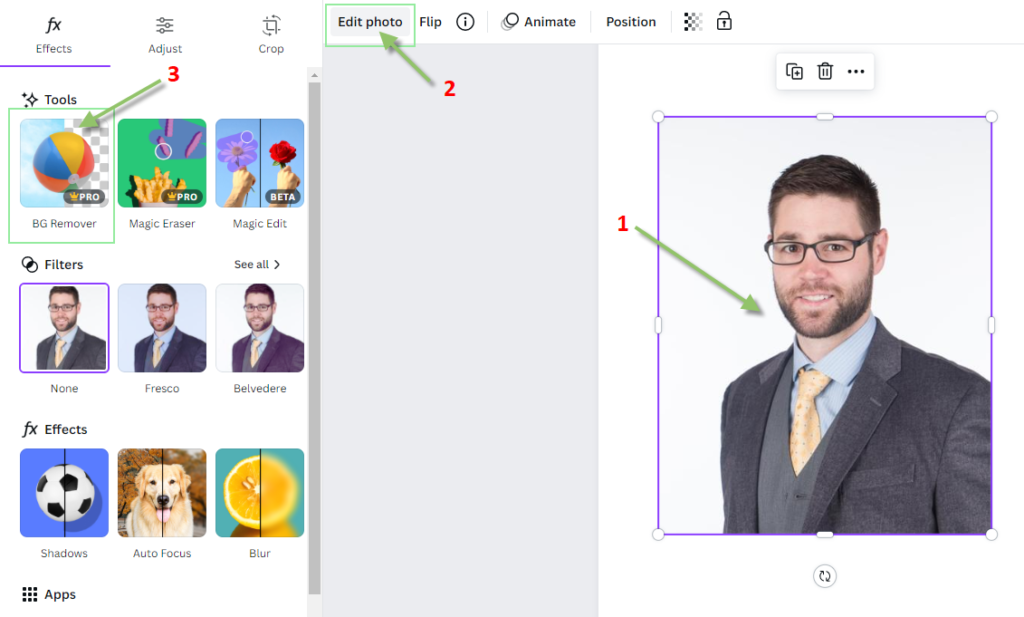
Step 4. Select BG Remover Tool
Select your image on the canvas. Once the image is selected, you will see several options at the top of the menu. Click on “Edit Photo.” Then, click on “BG Remover” in the Effects options. Canva will automatically remove the background from the selected image/element, making it transparent.
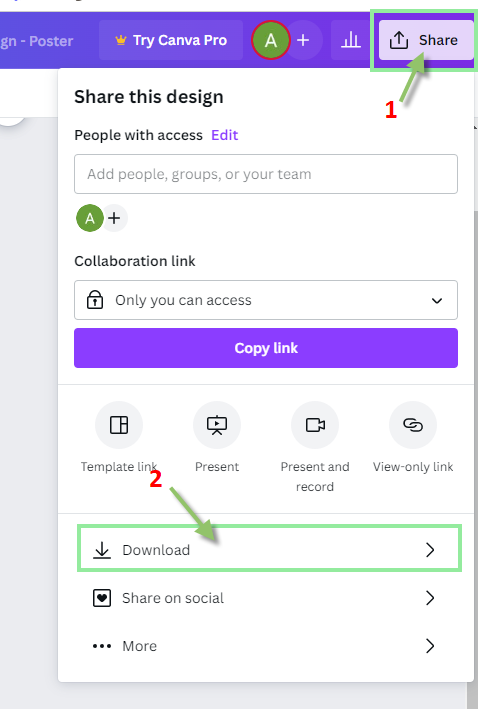
Step 5. Download as PNG
After removing the background, download your image by clicking on “Shares” and selecting “Download.” Choose the PNG format for the downloaded image.
By following these steps, you can easily create a transparent background for your images. Canva is an intuitive online platform that allows you to design a wide range of visuals, from thumbnails to logos and cover designs. It serves as a great alternative for those who may not have experience or skills in Adobe Photoshop. However, it’s important to note that Photoshop remains the top choice for professional image editing due to its extensive features and capabilities.
Why Use a Transparent Background?
Using a transparent background offers several advantages in various design contexts. Here are a few reasons why using a transparent background can be beneficial:
Versatility in design: With a transparent background, you can easily place your subject or element onto different backgrounds without any visible edges or boundaries. This flexibility allows for seamless integration into various designs, layouts, or backgrounds.
Professional appearance: A transparent background gives your design a polished and professional look. It eliminates the distraction of a solid background and focuses the viewer’s attention solely on the subject or element, enhancing the overall visual appeal.
Improved branding: A transparent background is particularly useful for logos and branding materials. It allows your logo to blend seamlessly into different marketing materials, websites, or promotional content, maintaining brand consistency and professionalism.
Enhanced website aesthetics: Transparent backgrounds are commonly used in web design. They enable elements like images, icons, or buttons to seamlessly integrate into the overall website design, creating a more visually pleasing and cohesive user experience.
Remove.bg: The Solution for Transparent Backgrounds
Remove.bg is an exceptional tool specifically designed to generate transparent backgrounds. With its advanced algorithms and AI technology, Remove.bg efficiently eliminates the background from your images, leaving you with a pristine and professional transparent background.
Whether you’re a novice or an experienced designer, Remove.bg offers a user-friendly solution for achieving remarkable results without compromising the subject’s integrity. Just upload your image, and Remove.bg will swiftly and accurately handle the background removal process. Say goodbye to laborious manual editing and let Remove.bg effortlessly assist you in achieving flawless transparent backgrounds.
Please note that while Remove.bg excels in most cases, there may be instances where the AI struggles to accurately remove the background. This typically occurs when dealing with complex subjects like flowing hair, fur, or when the background and subject colors are very similar. In such cases, you can rely on Hello Edits, a professional photo editing company specializing in creating transparent backgrounds for complex images.