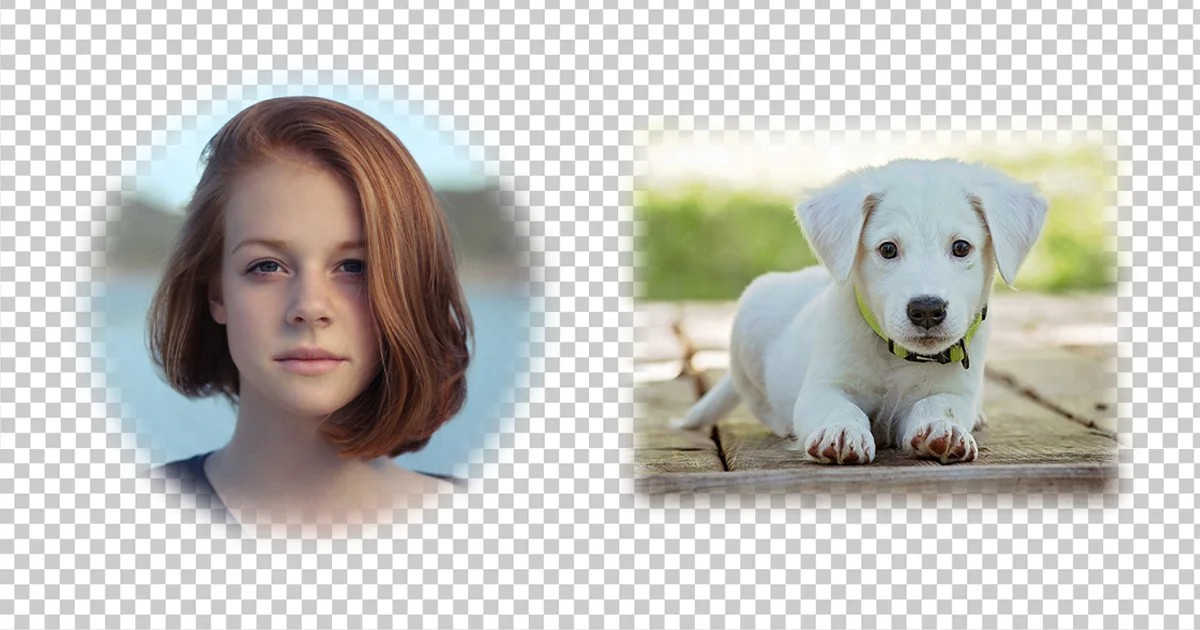
Feathering in Photoshop is an effortless process. You only need to know which tool can select the object and how to apply feathering to the edges for a softer effect. Feathering is particularly useful when blending a selected object or subject into a background, creating seamless composite images, or applying various effects without harsh edges.
By feathering the edges of a selection, you can achieve a more realistic and aesthetically pleasing result. The process involves two simple steps: first, selecting the object, and second, applying the feather effect.
What Does 'Feather' Mean in Photoshop?
In Photoshop, feathering refers to a technique used to create a soft, gradual transition between a selected area and its surrounding pixels. When you make a selection in Photoshop, the edges of that selection are usually sharp and defined. Feathering allows you to blur or soften those edges, making the transition between the selected and unselected areas more smooth and natural.
The process of feathering involves adjusting the pixels at the edge of the selection by applying a blur effect that gradually fades the selection into the surrounding pixels. The amount of feathering is customizable, allowing you to control the softness or hardness of the transition.
How to Feather Edges in Photoshop?
Feathering, also known as softening or antialiasing, refers to the gradual transition between a selected area and its surrounding pixels. It prevents harsh, jagged edges, and produces a natural, gradual blend. This technique is particularly useful when integrating objects into a new background, creating composite images, or applying localized adjustments to a photo.
Here’s how you can feather edges in Photoshop:
Step 1. Open Your Image
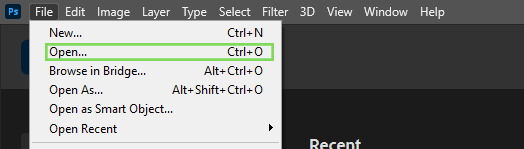
Before you can start feathering edges, you need to open the image you want to work on in Photoshop. To do this, launch Photoshop and go to the top menu bar. Click on “File” and then select “Open.” Browse your computer’s files, locate your desired image, and click “Open.”
Step 2. Making a Selection
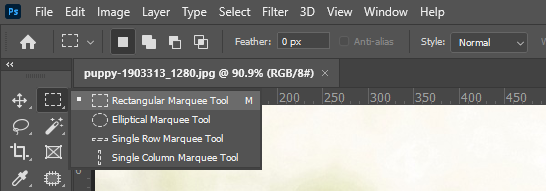
To feather edges, you need to create a selection first. There are various tools at your disposal to make selections, such as the Marquee Tool, Quick Selection Tool, Pen Tool, or Object Selection Tool. Choose the appropriate tool depending on the complexity of the area you wish to select.
For instance, the Rectangular Marquee Tool is ideal for making simple rectangular or square selections, while the Quick Selection Tool is useful for selecting areas based on color and texture. The Pen Tool offers precise control for complex selections, and the Object Selection Tool can identify and select specific objects within the image.
Step 3: Click on "Select and Mask" Tool
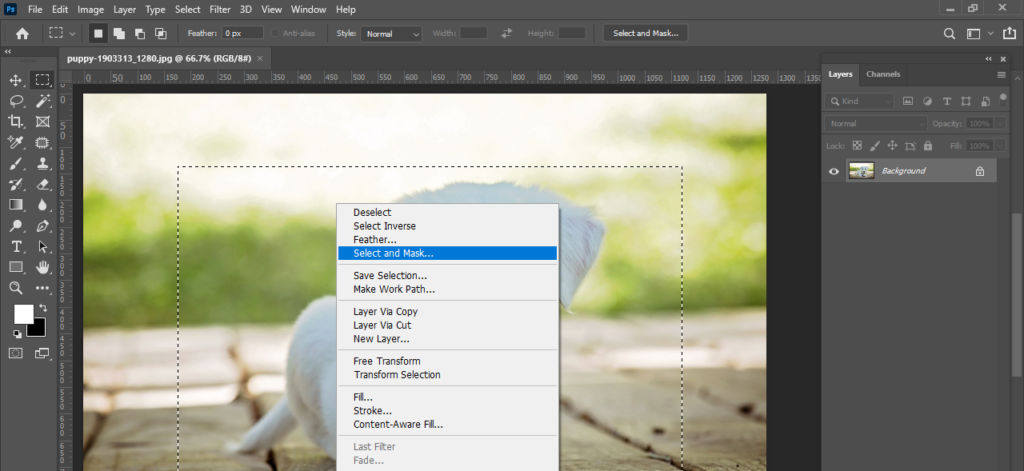
Once you have your initial selection, right-click the mouse and choose “Select and Mask,” or go to the top menu bar and click on “Select.” From the dropdown menu, select “Select and Mask.” Alternatively, you can use the keyboard shortcut “Ctrl+Alt+R” (Windows) or “Cmd+Opt+R” (Mac) to access the “Select and Mask” tool quickly.
Step 4: Feather Your Selection
To feather the edges, look for the “Feather” slider located under the “Global Refinements” section on the right-hand side of the workspace.
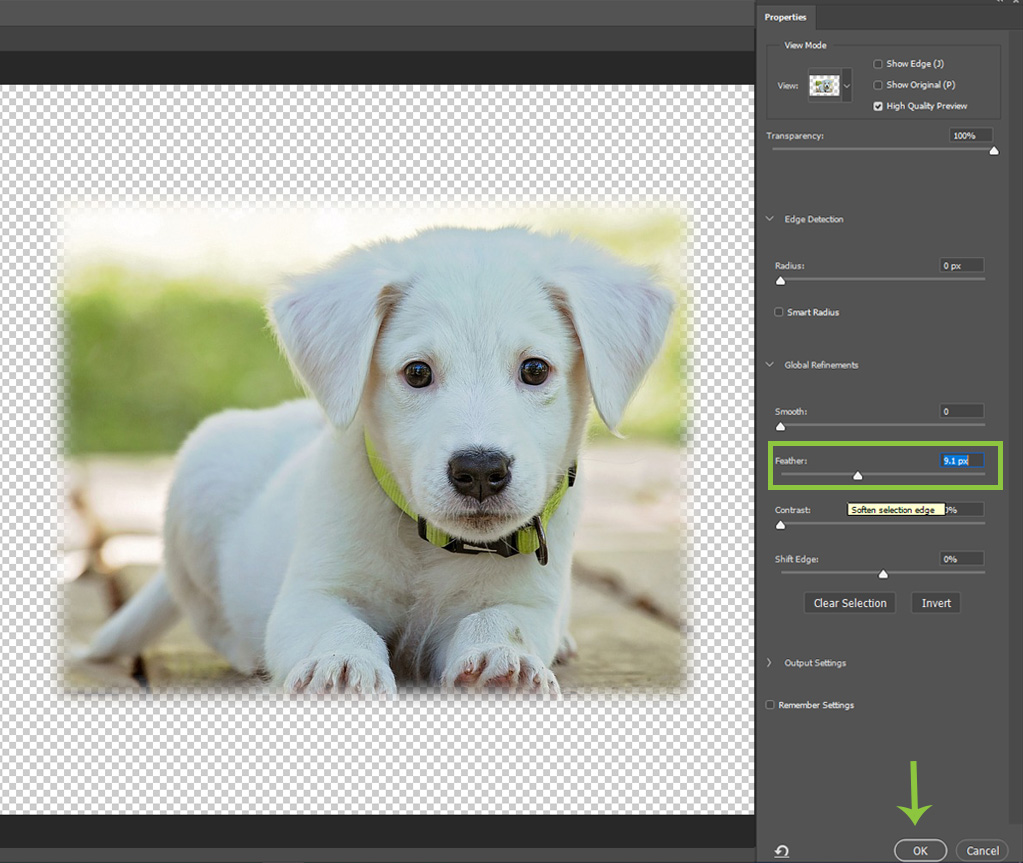
Adjust the “Feather” slider until you achieve the desired smoothness in the transition between the selected area and the background. Keep in mind that the ideal feathering value may vary depending on the resolution of your image and the effect you want to achieve.
Once you are satisfied with the feathering effect, click the “OK” button located at the bottom of Properties tab.
Step 5 – Copy and Paste
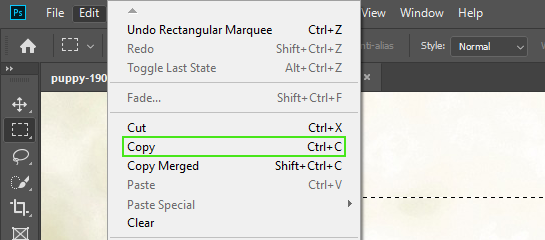
You might be surprised to see all your Feather Edges edits disappear once you click OK, but don’t worry; they are still there.
To do this, press the Command key and C (for Mac) or Ctrl and C (for Windows) to copy the selection. Next, press Ctrl and V (for Windows) or Command and V (for Mac) to paste the edited selection into a new layer. When you do that, it will automatically create a new layer, so you do not need to create a new layer manually.
Alternatively, you can use the top menu bar, select “Edit,” then choose “Copy,” and finally, click “Edit” again, choose “Paste,” and it will create a new layer with the copied and edited selection, achieving the same result.

To see your result now, you can turn off the visibility of the original layer from the layer panel by clicking on the eye icon next to the layer. This action will hide the original image, allowing you to view your edited image with feathered edges against a transparent background.
Why should you use feathering in Photoshop?
Feathering in Photoshop is a valuable technique that offers several key benefits. It can be used for various purposes such as banner design, merging photos, adjusting edges, background and object color, and fulfilling various creative design needs that require adding a feather between two objects. Here are some reasons why you should use feathering:
Natural Blending
One of the primary advantages of feathering is its ability to create smooth and natural transitions between selected areas and their surroundings. Whether you’re integrating objects into new backgrounds or making localized adjustments, feathering ensures a seamless blend, avoiding harsh and abrupt edges.
Enhanced Photo Retouching
Feathering plays a crucial role in portrait retouching by softening the edges of adjustments. It enables more subtle application of retouching effects, such as skin smoothing, dodging, or burning, without leaving visible demarcation lines.
Refined Brushwork
Whether you’re painting or using brushes to apply effects, feathering helps avoid harsh brush strokes, making color application or other creative effects more subtle and visually appealing.
Compositing
When combining multiple images or elements, feathering helps merge them seamlessly. Whether you’re working on photo collages, digital art, or graphic design, feathering ensures that the different components blend harmoniously, resulting in a polished and professional-looking composition.
Feathering in Photoshop is essential for achieving professional-grade results in image editing, compositing, and retouching. It adds finesse to your work, ensuring that selections and adjustments blend seamlessly with the rest of the image, and ultimately enhances the overall quality of your creative projects.
Final Words
Now that you have learned how to feather edges in Photoshop, you can confidently use this technique anytime you need to enhance your images. By following the step-by-step guide outlined in this article, you can easily utilize various selection tools and the “Select and Mask” feature to create precise selections and achieve the desired feathering effect. Remember to experiment with different feathering radii, depending on the resolution and complexity of your image, to find the perfect balance.
So, go ahead and explore the endless possibilities of feathering edges in Photoshop. Let the seamless blends and smooth transitions elevate the quality of your visual creations, and with each project, you will refine your skills and unlock new levels of creativity. Happy editing!