Are you tired of cropping your images in a rectangular shape or a circle shape that just doesn’t look right? Creating a perfect circle shape is easy with Photoshop’s frame tool. Circle shapes are popular for designing banners, marketing posters, and other graphics. Let’s dive in and learn how to crop a circle in Photoshop!
crop image in circle shape in photoshop
we will guide you through the process of using the Frame Tool to crop an image into a circle shape in Photoshop, step-by-step. Whether you’re a beginner or an experienced user, this article will be helpful for you.
Step 1: Open Your Image
The first thing you need to do is open the image you want to work on in Photoshop. You can do this by going to File > Open and selecting the image file.

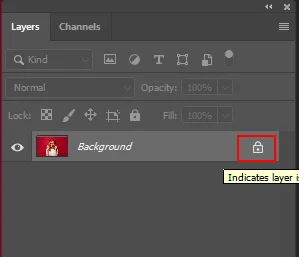
Step 2: Unlock the image layer
To unlock a layer in Photoshop, simply double-click on the layer in the Layers panel and click “OK” in the dialog box that appears. This will unlock the layer and allow you to make changes to it.

You can also unlock a layer in Photoshop by simply clicking on the lock icon next to the layer in the Layers panel. This will unlock the layer and allow you to make changes to it.
If you can’t find the Layers panel, you can press F7 on your keyboard to make it visible, or you can go to the Window menu and select Layers to show it.
Step 3: Select the Frame Tool
Once you have your image open in Photoshop, select the Frame Tool from the toolbar on the left-hand side of the screen. You can also use the keyboard shortcut “K” to select this tool.

Step 4: Select Elliptical frame

In the Tool options bar, choose a elliptical frame. Now, you can click and drag on the canvas to create an elliptical frame. You can adjust the size and position of the frame by dragging its edges or using the Transform controls.
Step 5: Draw Your Circle

Click and drag on the canvas to draw your circle frame. You can adjust the size and position of the frame by dragging its edges or by using the Transform controls.
To achieve a perfectly round shape, hold the Shift key while drawing the circle. If you want to move the circle to a precise location, hold the Spacebar on your keyboard and drag it to the desired position.
Step 6: Reposition the Frame or image
To edit the frame layer thumbnail or the frame itself, select the frame layer in the Layers panel and choose the Move tool from the toolbar. Click on the frame layer thumbnail in the Layers panel to select it, and use the Free Transform tool (Ctrl+T or Cmd+T on a Mac) to resize, rotate, or move the frame layer thumbnail. Once you have made the desired changes, press Enter or Return to apply the transformation. Note that the changes you make to the frame layer thumbnail will also be reflected in the actual frame on your image.

Step 7: Save the image as a PNG file
Save your image by going to File > Save or File > Save As. Choose your file format PNG and destination folder, and click “Save.”

Is the Frame Tool available in every version of Photoshop?
No, the Frame Tool is a relatively new feature in Photoshop that was introduced in Photoshop CC 2019 (version 20.0). It may not be available in older versions of Photoshop. If you have an older version of Photoshop and don’t have access to the Frame Tool, you can use alternative methods to crop images into circular or other shapes, such as using the Elliptical Marquee Tool or using a shape layer as a mask.


